
Wood Restoration Guide
Laser Sander for Wood: Laser Sanding Alternative for Paint Stripping
Looking for a laser sander for wood? In most restoration jobs, this means a pulsed laser cleaner used to remove paint, varnish, soot, grime, or surface coatings without sandpaper, chemicals, or abrasive blasting.
Table of Contents:
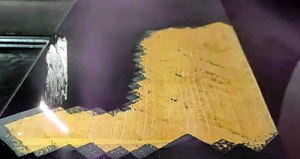
Laser cleaning can remove paint and coatings from wood without direct abrasive contact.
Quick Answer: Can a Laser Replace Sanding on Wood?
Search intent: coating removal, not wood shaping
If you are searching for a laser sander for wood, you are probably not looking for another orbital sander, belt sander, or sanding disc. You are likely trying to remove paint, varnish, soot, grime, smoke residue, adhesive, or an old coating from wood without damaging the surface underneath. That is where a laser becomes relevant.
What the machine actually is
A laser sander for wood is not a sander in the traditional woodworking sense. It does not use abrasive paper. It does not flatten a warped board, smooth rough lumber, or shape an edge. In real industrial and restoration applications, the phrase usually points to a pulsed laser cleaning machine used as a non-abrasive alternative to sanding for coating removal and surface restoration.
Where a laser can replace sanding
Not completely. A laser can replace sanding for selected coating removal and surface cleaning jobs, but it does not replace sanding for smoothing, flattening, leveling, shaping, or finish preparation on bare wood. Think of the laser as a selective stripping and cleaning tool. It is useful when you need to remove a layer from the surface without scraping the entire wood profile. It is not designed to create a final sanded texture across a flat board.
Quick decision rule
Use a laser when the task is old paint removal, varnish stripping, soot cleaning, surface grime removal, adhesive residue reduction, restoration of carved details, or cleaning valuable wood surfaces where abrasive tools are risky. Use a traditional sander when the task is flattening a panel, smoothing rough lumber, sanding between coats, preparing bare wood for finishing, or removing wood thickness evenly.
Why People Search for a Laser Sander for Wood
The phrase is imperfect, but the demand is real
The phrase "laser sander" is not always technically precise, but the intent behind it is very real. Many users are looking for a cleaner way to handle difficult wood restoration jobs. They may have tried sanding by hand and found it too slow. They may be worried about dust, chemical strippers, old paint, detailed carvings, or damaging antique wood. Some are trying to reduce labor in a restoration shop. Others are comparing laser stripping wood price with manual sanding cost.
Questions buyers need answered
That means the content should not simply say "laser cleaning wood" and stop there. It should answer the buyer's real questions: Is there such a thing as a laser sander for wood? Is it a sanding machine or a cleaning machine? Can it remove paint and varnish? Can it replace orbital sanding? What wood surfaces are suitable? What are the limits? What affects price? Which machine should I test?
The practical answer
The practical answer is that a pulsed laser cleaner can act as a laser sanding alternative for coating removal and restoration, but it is not a universal woodworking sander. That distinction matters because it matches the real search intent behind laser sander for wood, laser sanding alternative, laser stripping wood price, and laser cleaning machine for wood.
How Laser Cleaning Works on Wood
Surface layer first
Laser cleaning uses focused light energy to interact with the surface layer. In wood restoration, that surface layer may be paint, varnish, stain, soot, grime, grease, old finish, residue, or light contamination. When the coating absorbs the laser energy, it heats, expands, breaks down, or separates from the substrate.
Pulse control matters
The process is often called laser ablation. In practical terms, the laser is tuned so the unwanted layer responds more strongly than the wood underneath. That is why pulse control matters. A pulsed laser cleaner delivers energy in short bursts, which can make it easier to control heat input on sensitive materials.
Wood samples react differently
Wood is more variable than metal. Oak, pine, maple, cherry, plywood, painted wood, old varnish, and smoke-damaged wood can all react differently. Even the same wood species can behave differently depending on moisture, resin, coating thickness, color, age, grain, and surface finish. That is why sample testing is not optional. It is the bridge between a promising process and a safe production method.
Laser Sander vs Traditional Sanding, Chemical Stripping, and Blasting
Choose by the layer you need to remove
Laser cleaning and sanding are not enemies. They solve different jobs. Laser cleaning is non-contact and precise. It can be tuned for the coating layer and works especially well when a surface has details that are hard to sand evenly. Sanding is simple, fast, and low-cost for bare wood preparation. It removes wood fibers, smooths uneven surfaces, and creates a finish-ready texture. The question is not which one is always better. The real question is what layer you are trying to remove.

| Method | Best For | Wood Impact | Notes |
|---|---|---|---|
| Laser sanding alternative | Paint, varnish, soot, grime, coating removal, restoration work | Non-contact; settings must be tested to avoid scorching | Best when surface detail and controlled removal matter |
| Orbital or belt sanding | Flattening, smoothing, leveling, finish preparation | Abrasive; removes wood fibers and can round details | Still the right tool for bare wood finishing |
| Chemical stripping | Heavy coatings, complex shapes, small workshops | Can soften coatings; residue and cleanup must be managed | Lower tool cost, higher handling and safety burden |
| Blasting | Rough cleaning on durable surfaces | Can be aggressive on grain and soft wood areas | Not ideal for delicate wood restoration |
When Laser Works Better Than Sanding
Detailed surfaces and carved profiles
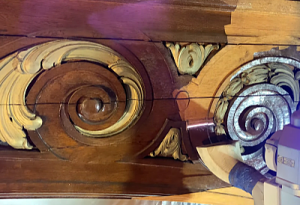
Laser cleaning is strongest when sanding creates risk. Detailed carvings, curved profiles, antique panels, moldings, furniture edges, decorative doors, wooden frames, sculptures, and architectural woodwork can be difficult to sand evenly. Abrasive sanding can remove crisp edges and change the character of the surface.

Less mechanical damage
In those cases, a pulsed laser cleaner may help remove paint, varnish, soot, and dirt while reducing mechanical damage. It can target the surface layer more selectively than a sanding disc. It can also reduce the need for chemical stripping, which may be messy, slow, and difficult to control around joints or detailed surfaces.
Dust-sensitive restoration work
Laser cleaning can also be useful when dust control matters. Sanding creates fine dust, and painted surfaces may create additional safety concerns. Laser cleaning still requires proper extraction and safety controls, but it does not create sanding dust in the same way.
Typical applications
Good application examples include antique furniture restoration, wooden door paint stripping, varnish removal on carved panels, smoke residue cleaning, wooden frame restoration, artwork cleaning, preparing selected wooden surfaces before refinishing, and restoring detailed architectural elements. This is why people searching for a laser sander often end up looking at a laser cleaning machine rather than a woodworking sander.

Wood Sample Check
Not sure whether your wood project needs laser stripping or traditional sanding?
Send MimoWork your wood type, coating, surface photo, product size, and target finish. A sample test can show whether a pulsed laser cleaner is suitable before you invest in the wrong process.
When a Laser Should Not Replace Sanding
Flattening and smoothing still need sanding
A laser is not a magic replacement for every wood sanding job. If the goal is to make wood flat, smooth, or dimensionally correct, use the proper woodworking tool. A laser will not replace a planer, wide belt sander, orbital sander, scraper, or finishing process.
Use traditional tools for these jobs
Do not choose laser cleaning as the first option for rough lumber preparation, sanding between finish coats, removing saw marks, leveling a tabletop, shaping edges, removing large amounts of wood, or creating a uniform final sanding scratch pattern.
Heat-sensitive wood needs caution
Laser cleaning also requires testing when the wood is dark, resin-heavy, wet, uneven, highly coated, or heat-sensitive. If the laser setting is too aggressive, the surface can scorch, discolor, or lose detail. If the setting is too weak, paint removal will be slow or incomplete. The practical rule is simple: use the laser for selective surface layer removal; use sanding for wood surface shaping and finishing.
Laser Stripping Wood Price: What Affects Cost?
Project complexity drives price
The price of laser stripping wood depends on both the machine and the project. It is not enough to ask how much a laser sander for wood costs. The better question is: what coating, what wood, what area, what finish requirement, and what production volume?
Main cost drivers
Important price factors include laser power, pulse control, machine configuration, safety enclosure, extraction system, workpiece size, coating type, coating thickness, wood species, surface detail, automation level, operator training, and testing time.
Control matters more than raw power
A higher-power machine can improve throughput on suitable surfaces, but power alone is not the whole answer. On wood, control is as important as speed. A process that is too aggressive may remove coating quickly but damage the wood. For restoration work, the right setting is often the setting that removes the unwanted layer cleanly while preserving the substrate.
Compare total cost, not tool price only
Manual sanding tools are cheaper upfront. Chemical strippers can also be cheaper at the start. However, the total cost may include labor, consumables, cleanup, disposal, dust control, rework, damaged pieces, and operator safety. For detailed or high-value wood, reducing damage risk can matter more than the cheapest tool price.
| Price Factor | Why It Matters | What to Prepare |
|---|---|---|
| Coating type | Paint, varnish, soot, and oil absorb laser energy differently | Send coating photos and material history if known |
| Wood species | Oak, pine, maple, plywood, and resin-heavy wood can react differently | Send wood type and sample piece |
| Surface shape | Flat boards are easier than carved profiles and corners | Send product dimensions and surface photos |
| Production volume | One-off restoration and batch work need different setups | Share daily output and workflow expectations |
Recommended Machine Direction: Pulsed Laser Cleaner
Why pulsed laser is the test direction
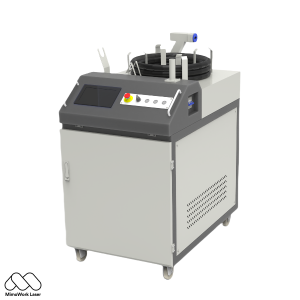
For wood paint stripping and restoration testing, a pulsed laser cleaner is the machine direction to evaluate. Pulsed output is generally more controllable on sensitive surfaces than continuous laser output. It allows the operator to adjust energy delivery, scanning speed, pulse behavior, and cleaning intensity.
Best evaluated with real samples
MimoWork's pulsed laser cleaner is suitable for testing wood coating removal, varnish stripping, surface cleaning, restoration work, and selected non-contact surface preparation. The final configuration should be chosen only after testing the actual material.
Workflow for Testing Wood with a Laser
Test in a controlled sequence
A serious laser wood cleaning test should follow a controlled process. Identify the wood species, coating type, and surface condition. Photograph the surface and note whether the piece is antique, decorative, structural, or replaceable. Choose a test area or sacrificial sample. Start with conservative settings. Test several power, speed, frequency, and pass combinations. Inspect for coating removal, scorching, grain change, odor, residue, and surface texture. Compare the result with sanding and chemical stripping. Decide whether the laser should be used alone or as part of a hybrid process.

Hybrid workflows are often realistic
For some projects, laser cleaning may remove most of the coating, followed by light hand finishing. For other projects, the laser may be used only on detailed areas where sanding is too risky. This hybrid logic is often the most realistic answer for wood restoration shops.
Safety and Surface Quality Notes
Fume and fire safety
Laser cleaning wood requires proper safety planning. Wood coatings can produce smoke, fumes, particles, and odor. Old paint may contain unknown materials. Varnish, oil, adhesive, and resin can react differently under heat. A proper extraction system is important.
Operator protection
Eye protection, controlled access, fire awareness, operator training, and good workholding should be part of the process. Wood is combustible, so conservative testing is not just about appearance. It is also about safety.
Inspect after cleaning, not only during the pass
Surface quality should be judged after cleaning, not only during the laser pass. Check color, grain, texture, remaining coating, odor, dust, and how the wood behaves if a new finish will be applied.
Wood and Coating Suitability
No universal wood setting
The same laser cleaner can behave very differently from one wood project to another. That is why a good laser sanding alternative page should not promise that every wood can be stripped in the same way. Wood is an organic material. Its density, grain, color, moisture, resin content, coating history, and surface finish all change the way it absorbs laser energy.

Hardwoods: often worth testing
Hardwoods such as oak, maple, cherry, walnut, and beech are often good candidates for testing because they can have a stable surface and enough density to tolerate controlled cleaning. That does not mean every hardwood is automatically safe. A dark finish, heavy varnish, oil residue, or old unknown coating can change the result.
Softwoods: start gently
Softwoods such as pine, fir, and cedar need more caution. They can contain resin, softer growth rings, and more uneven density. A laser setting that removes paint from one area may affect another area differently. If the goal is preserving the surface, testing should start gently.
Plywood and veneer: protect the surface layer
Plywood and engineered wood need special attention. Veneer thickness, glue layers, surface coating, and heat sensitivity can affect whether laser stripping is practical. A thin veneer may not tolerate aggressive removal. If the surface layer is valuable or very thin, the test should focus on coating removal with minimal heat input.
Old paint: coating history matters
Old painted wood can be a strong use case, but the coating history matters. Multiple paint layers, old oil-based paint, varnish, filler, adhesive, dirt, and smoke residue may respond at different speeds. The laser may remove one layer quickly while another layer needs a different setting. That is why a single best setting chart is less useful than a controlled sample test.
If the surface will be refinished
If the final surface will be refinished, the inspection standard should include more than whether the paint is gone. The cleaned wood should also be checked for color change, grain texture, residue, adhesion of the next finish, and whether additional light sanding is still required.
Common Mistakes When Using a Laser on Wood
Mistake 1: treating laser like sandpaper
The first mistake is treating laser cleaning like ordinary sanding. Sanding is forgiving because the operator can feel the surface and gradually remove material. A laser is different. It can change the surface quickly if the energy is too high, the scanning speed is too slow, or the focus is wrong.
Mistake 2: testing only the easy surface
The second mistake is testing only on an easy area. A flat, smooth, open section may clean well, while corners, carved details, edges, knots, and old repaired areas behave differently. If the real job includes moldings or detailed carving, the test should include those details.
Mistake 3: judging the result too early
The third mistake is judging the result too early. A surface can look clean immediately after the laser pass but still contain residue, odor, remaining coating in the grain, or color changes that become obvious after wiping or refinishing. Good testing includes cleaning, inspection, and sometimes a small finishing trial.
Mistake 4: ignoring extraction
The fourth mistake is ignoring extraction. Laser cleaning can reduce sanding dust, but it does not mean the process is free of smoke or particles. Coatings, paint, varnish, glue, and contaminants can produce fumes. A wood laser stripping setup should include fume extraction, filtration planning, and operator protection.
Mistake 5: buying by power only
The fifth mistake is buying only by power. More power can increase speed, but wood restoration is often about control. A lower or moderate power setting with better pulse control may produce a safer result than simply pushing more energy into the surface.
What to Send Before Asking for a Machine Recommendation
Send project details, not just a keyword
If you want a practical recommendation, prepare more than a keyword. Send the wood type, the coating type, the age of the coating if known, surface photos, product size, cleaning area, target finish, expected daily output, and whether the work is one-off restoration or repeat production.
Photos that help the test
Photos should include close-up detail, the full workpiece, edges or carved areas, and any areas where the coating is thick, damaged, burned, oily, or uneven. If you can send a small sample, that is even better.
Information needed for pricing
For price discussions, include whether you need a handheld solution, a workstation, an enclosed system, automation, fixture support, or extraction guidance. A small restoration shop and a production line do not need the same setup.
What a useful recommendation should include
The more specific the project information is, the more useful the recommendation becomes. A good laser supplier should not simply say yes, it works on wood. The better answer is: here is what should be tested, here is the risk, here is the machine direction, and here is where sanding may still be needed.
Video Guides: Laser Cleaning Process
Open the video guides to see the laser cleaning process in action before testing your wood sample.
Wood Sample Test
Want to know whether your wood project can use laser stripping instead of sanding?
Send MimoWork your wood type, coating, surface photo, product size, and target finish. Our team can help evaluate whether a pulsed laser cleaner is suitable before you invest in the wrong process.