
What is Surface Photo Etching on Glass?
Contents:
Introduction: What is Surface Photo Etching?
Surface photo etching is a precision manufacturing process that uses photolithography and chemical etching to produce burr-free, stress-free metal components with fine features.
It is widely used for electronics, semiconductor parts, and precision meshes.
The process involves applying a photoresist, exposing it to UV light through photomask, developing the pattern, and then chemically etching the exposed metal areas.
Surface Photo Etching
Why Surface Etching is Different From Internal Laser Engraving?
This article explores Surface Photo Etching on glass, a process that uses Surface Etching techniques to create permanent surface images. We will clarify its uniqueness by first explaining its technical principles and then contrasting it with the fundamentally different approach of Internal Laser Engraving.
The Fundamental Difference
Surface Etching: A subtractive manufacturing process. It uses chemical acids or high-speed micro-abrasive blasting to selectively remove material from the glass surface, creating recessed, textured areas. The image is physically "carved" onto the surface.
Internal Laser Engraving: An internal modification process. It employs high-energy laser pulses focused precisely on a point inside the glass. The laser energy creates a tiny, controlled crack or "pop" at that point, leaving the outer surface perfectly smooth. The image is composed of thousands of these internal micro-points.
Process Characteristics & Workflow Comparison
Surface Etching:
Workflow: Digital design → Creation of a physical mask (e.g., film) → Coating glass with photoresist, exposure, and development → Chemical etching or sandblasting → Cleaning and mask removal.
Key Points: Involves chemicals or abrasives; relies on physical masks; exceptionally well-suited for mass replication of the same design; highly adaptable to various glass thicknesses and colors.
Internal Laser Engraving:
Workflow: Digital design → Placing glass in laser machine → Computer-controlled laser focus scans point-by-point in 3D space.
Key Points: Fully digital, contactless processing; requires no chemicals or masks; excels at creating complex 3D effects and variable data like serial numbers; processing speed often relates to image complexity.
Sensory and Functional Differences
| Feature | Surface Etching | Internal Laser Engraving |
|---|---|---|
| Visual Appearance | Frosted surface with a classic artistic look. | 3D light points inside glass with a modern tech style. |
| Tactile Sensation | Textured and can be felt by touch. | Smooth surface with no tactile image. |
| Durability | Scratch-resistant but may wear over time. | Permanent image protected inside the glass. |
| Color / Grayscale | Mostly monochrome; limited color options. | White internal points; grayscale via dot density. |
Laser Glass Engraving Methods
Surface etching and internal laser engraving are two major methods in the laser glass engraving process, both of which can be performed using a professional glass engraving machine.
Surface etching removes material from the outer layer of the glass, creating a frosted texture that reflects light and produces a visible pattern.
Because the engraved area can be felt by touch, this method is often used for logos, decorative graphics, and functional markings.
It is commonly achieved with CO₂-based glass engraving machines.
Internal laser engraving, also known as subsurface laser engraving, forms thousands of microscopic light points inside the glass without damaging the external surface.
These points combine to create a three-dimensional image suspended within the material.
Since the engraving is enclosed inside the glass, the surface remains smooth and highly resistant to scratches and wear.
By controlling point density during the laser glass engraving process, grayscale and shading effects can be produced, making this method ideal for portraits, awards, and premium crystal products.
Why Surface Etching is Ideal for Your Project?
Surface photo etching offers a unique combination of tactile texture, classic frosted aesthetics, and scalability for high-volume production. Whether for architectural signage, decorative panels, or personalized gifts, this process ensures durable, visually striking, and artisanal-quality results that cannot be achieved by flat printing or internal engraving.
Key Characteristics & Visual Effects of Photo Etching on Glass
The appeal of surface photo etching goes far beyond simply "printing an image on glass." It creates a unique sensory experience that blends sight and touch. Here are its defining characteristics that distinguish it from other technologies, especially internal laser engraving.
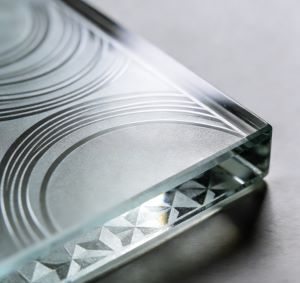
The Signature Frosted-Matte Finish
Visual Effect: The etched area presents an elegant, opaque white or light gray appearance, similar to frosted or frost-covered glass.
The image itself does not emit light; its contrast relies entirely on the difference between light scattered by the etched areas and direct light passing through the untouched, clear glass.

Tactile Dimensionality: Feeling the Image
Tactile Experience: Running a finger over the design allows one to clearly feel the boundary and textural change between the etched area and the original smooth surface.
This dimensionality gives the piece a physical presence and artisanal quality unachievable by any flat printing or internal engraving.
Durability and Material Considerations
Durability: The etched pattern is resistant to sunlight,moisture, and most chemical cleaners, and will not fade or peel.
Its longevity is equivalent to that of the glass itself.
Key Consideration: Since the image resides on the surface, its wear resistance depends on the hardness of the glass. In everyday use (e.g., as a tabletop or a frequently touched sign), the etched area may, over a long period, be more prone to accumulating stains or showing slight wear compared to the surrounding smooth surface.
Therefore, for high-contact items, the application of a protective coating might be considered.
Applications & Project Examples of Surface Photo Etching
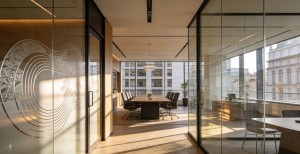
Architectural & Signage Applications
Key Advantages: Exceptional durability, high-contrast legibility, professional appearance, and suitability for large-scale production.
Why It's Ideal: The etched frosted surface is impervious to sun and rain, and will not fade or peel like printed materials.
The matte finish ensures clear readability under any lighting condition, while the tactile texture enhances the overall premium feel.
Project Examples:
- Company Name Walls / Reception Signage: Logos and company names etched onto substantial glass, signifying permanence and professionalism.
- Indoor/Outdoor Directional Signs & Door Plates: Used in offices, hotels, and museums to indicate room numbers or departments, offering both clarity and modern aesthetic integration.
- Glass Partition & Door/Window Decoration: Brand patterns or decorative lines etched onto glass partitions in meeting rooms or stores, providing both privacy and visual appeal.
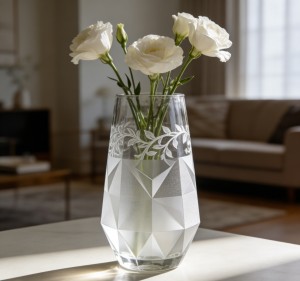
Memorabilia, Awards & Personalized Gifts

Key Advantages: Permanence, the precious feel conveyed by tactility, and a classic matte artistic effect.
Why It's Ideal: The physical alteration of etching symbolizes the “eternity” of achievement or memory. The texture felt by fingertips adds a sense of substance and uniqueness to awards or gifts.
Project Examples:
- Custom Medals, Trophies & Plaques: Created for sporting events, corporate anniversaries, or retirement commemorations, where the text and designs remain pristine for generations.
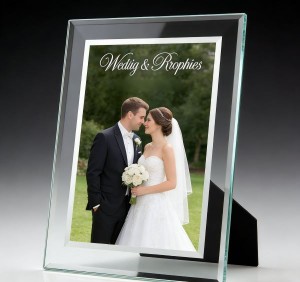
- Wedding or Anniversary Gifts: Glass photo frames, vases, or tableware etched with couples' names, dates, or messages.
- Personalized Homeware: Custom glass trays, paperweights, or window ornaments etched with family names, zodiac patterns, etc.
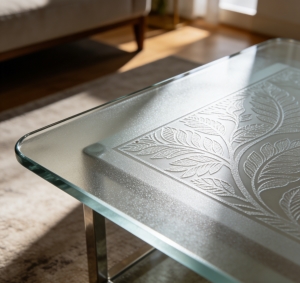
Functional Decor & Artwork
Key Advantages:
artistic expressiveness, light control, and an easy-to-clean surface.
Why It's Ideal: Etching can create any pattern from minimalist to intricate, utilizing the frosted surface to soften or scatter light.
The surface remains smooth (despite the texture) and is not prone to trapping grime.
Project Examples:
- Decorative Glass Panels: Used for kitchen splashbacks, bathroom mirror borders, or cabinet doors, etched with botanical or geometric patterns to add privacy and design flair.
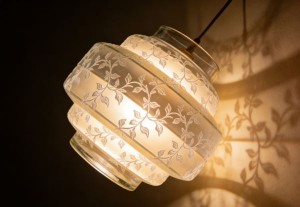
- Lamps & Lampshades: Patterns etched onto glass lampshades project soft, layered lighting effects when illuminated.
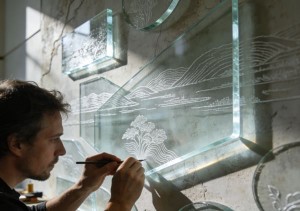
- Standalone Artwork: Artists utilize surface etching on glass of varying thicknesses and shapes to create pure art installations or murals.
Industrial & Instrument Panels
Key Advantages:
extreme wear resistance, chemical corrosion resistance, and lasting clarity.
Why It's Ideal: For equipment requiring frequent touch, cleaning, or exposure to harsh environments, etched markings and scales will not wear off from friction or solvents.
Project Examples:
- Instrument Control Panels: Scales, buttons, and labels on laboratory equipment, medical instruments, or industrial control boxes.
- Durable Labels / Signage: Suitable for environments like cleanrooms or kitchen equipment that require frequent washing and sterilization.
Not Sure How To Start Your Surface Photo Etching?
Contact Our Team for Guidance and Ideas
How It Works: The Step-by-Step Process of Surface Photo Etching
Surface photo etching can be achieved through different methods, ranging from industrial precision processes to accessible DIY techniques.
The core principle remains the same: using a resist (mask) to protect parts of the glass while exposing other areas to an etching agent that permanently alters the surface texture.
Method A: Industrial Precision Photo Etching Process
This is the professional method used for complex designs, high detail, and consistent
results in projects such as signage or batch production.
- Digital Design & Film Mastering: Your image is converted into a high-contrast digital file, which is used to create a precision photographic film negative or metal stencil.
- Coating & Exposure: The glass is thoroughly cleaned. A uniform layer of light-sensitive resist is applied, over which the film is placed.
UV light exposes and hardens the resist in the design areas. - Development: The unhardened resist is washed away, revealing the bare glass in the exact pattern to be etched.
- Etching: The panel undergoes chemical etching (using an acid solution such as hydrofluoric acid) or abrasive blasting (using fine particles).
This removes a micro-layer of glass in the exposed areas, creating the frosted, recessed texture. - Stripping & Finishing: The remaining resist is removed, and the glass is cleaned, revealing a precise, permanent, and tactile etched image.
Method B: DIY Handcrafted Etching (Using Etching Cream)
This is a popular and accessible method for home crafts, simple patterns, and one-off projects, such as personalizing drinkware or decorative items.
- Surface Preparation: Clean the glass thoroughly with rubbing alcohol to remove all dust, fingerprints, and oils, ensuring the stencil adheres properly.
- Design & Stencil Application: Prepare your design using adhesive vinyl cut with a craft cutter, or use pre-made stencils, masking tape, or contact paper. Secure the stencil firmly to the glass, smoothing out any bubbles to prevent cream from seeping underneath.
- Safety First: Put on gloves, long sleeves, and eye protection, and work in a well-ventilated area.
The etching cream is a chemical agent. - Applying the Etchant: Apply a thick, even layer of etching cream over the stencil openings using a brush or spatula, ensuring full coverage.
- Processing Time: Allow the cream to sit for the manufacturer’s recommended tim (usually 1–5 minutes). Do not let it dry out.
- Rinsing & Revealing: Rinse the glass thoroughly under running water, scrubbing gently to remove all cream residue.
Carefully peel off the stencil and clean any adhesive residue. The permanent frosted etching will be clearly visible once the glass is dry.
Recommended Machines for Surface Photo Etching
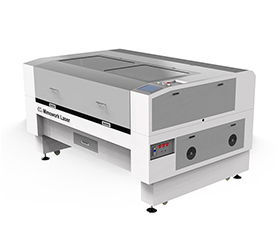
• Laser Source: CO2 laser
• Laser Power: 50W/65W/80W
• Customized Working Area
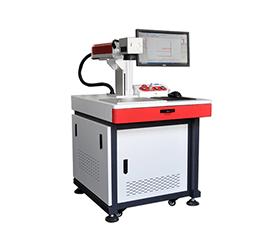
• Cold processing with few heat affected zone
• Suitable for precise laser marking
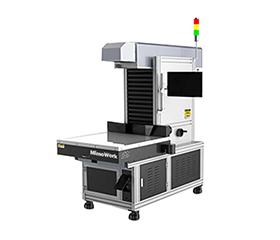
• Laser Power: 180W/250W/500W
• Working Area: 400mm * 400mm (15.7” * 15.7”)
FAQs
Glass etching constitutes a permanent alteration of the substrate. Options for rectification are limited:
For minor imperfections:The flaw may be addressed by incorporating a supplementary cosmetic etching (e.g., a datum point, serial grid, or technical symbol) to mask the flaw.
For significant errors or design rejection:The only permanent solution is to replace the entire glass component.
Yes.Surface photo etching can compromise the structural integrity of glass by removing material and introducing micro-scale surface defects. This effect is particularly pronounced with aggressive techniques such as deep etching or abrasive blasting, which significantly increase susceptibility to fracture under thermal stress (e.g., dishwasher cycles) or mechanical impact. In contrast, controlled chemical etching using hydrofluoric acid (HF) can refine surface topography, reducing flaws and enhancing laser performance in optical applications. For decorative finishes, light chemical etching generally maintains adequate strength; however, heavily etched or sandblasted glass experiences a substantial reduction in load-bearing capacity, rendering it unsuitable for functional components such as sliding doors.
Glass Surface Preparation Procedure
1. Initial Degreasing: Thoroughly cleanse all glass surfaces using an industrial-grade isopropyl alcohol solution to remove contaminants and ensure optimal cleanliness.
2. Safety Precaution: Personnel must wear appropriate personal protective equipment (PPE), specifically chemical-resistant gloves, throughout the process. Avoid any direct skin contact with the solvent, especially over open cuts or abrasions.
3. Final Rinse & Drying:Following the alcohol treatment, perform a comprehensive rinse with deionized (or clean, lint-free) water. Subsequently, dry the glass completely using a forced air system or a lint-free cloth to prevent spotting and ensure a streak-free finish.
Yes.Surface photo etching is a viable process for large-scale panels, particularly in architectural, artistic, and display applications. Specialists routinely handle panels exceeding one square meter, though standard industrial processing is typically optimized for dimensions up to approximately 1500mm x 600mm. Thicker substrates require extended processing times and increased cost.
While conventional etching is preferred for producing high-precision, burr-free components with fine details, large panels benefit from the technique's design adaptability, low tooling investment, and scalability. This makes it well-suited for applying intricate textures and patterns to architectural cladding, doors, signage, and other sizable surfaces.
Conclusion: Is Surface Photo Etching Right for You?
Surface photo etching remains the unrivaled technique for achieving durable, tactile, and visually opaque designs on glass, especially suited for architectural features, branding, and batch production.
It’s where traditional craft meets modern precision.
Ready to bring your vision to life?
If the distinct qualities of surface etching align with your project goals, the next step is to consult with a specialist.
Ready To Create Your Own Surface Photo Etching?
Advanced etching solutions for every design.
You may be interested in
Planning To Produce Surface Photo Etching on Glass In Batches?
Talk to Our Laser Experts and Find The Right Solution for Your Production.
Post time: Jan-13-2026