

Laser Engraving Paper for Glass: The Trick to Clear Etching
What Is Laser Engraving Paper for Glass?
Laser engraving paper for glass is a specialized auxiliary material designed to enable high-contrast, permanent markings on glass surfaces. When a CO₂ laser beam hits bare glass, much of the energy is reflected rather than absorbed, making it difficult to produce clear, visible marks. Engraving paper solves this problem by absorbing the laser energy and transferring it to the glass surface, creating a frosted or dark mark without damaging the material.
The paper typically contains pigments or coatings that react to the laser's heat, bonding the mark to the glass surface. Some products come in different colors (black, blue, red, gold), allowing for creative customization beyond standard white or frosted effects. For materials like glass or uncoated ceramics that are otherwise difficult to mark directly, laser engraving paper is often the most practical solution.
When Should You Use Laser Engraving Paper for Glass?
| Scenario | Recommendation |
|---|---|
| First-time glass engraving | Highly recommended—removes the guesswork and delivers consistent results |
| Previous direct engraving failed | Use it—direct engraving often produces faint or uneven marks |
| Need high-contrast marks | Essential—engraving paper produces sharp, dark, professional-looking results |
| Engraving curved surfaces | Recommended—paper conforms to gentle curves better than spray coatings |
| Batch production | Highly recommended—ensures consistent quality across multiple pieces |
| Low-cost prototyping | Optional—you can test with masking tape or wet paper first |
Tips for Better Glass Laser Engraving Results

Tip 1: Use Laser Engraving Paper
This is the most direct and effective way to improve glass engraving results. Glass has a high reflectivity to CO₂ lasers, and direct engraving often produces only a faint frosted effect. By covering the glass surface with laser engraving paper, the laser energy is absorbed by the paper and converted into heat, reacting with the glass surface to create a clear, high-contrast permanent mark.
- Key Points: Apply the paper to the glass surface, smooth out bubbles, and ensure full contact
- Advantage: Sharp, clear marks with high contrast; no damage to the glass surface
- Best For: Flat glass, glass cups, bottles, and jars
Tip 2: Lower Power, Increase Speed
Glass is extremely sensitive to thermal stress. Excessive power or slow speed causes heat buildup, leading to glass cracking. When engraving glass, follow the "low power, high speed" principle to avoid lingering too long in any one area. For deeper marks, use multiple light passes rather than a single high-power burn.
- Key Points: Allow glass to cool between passes before running the next one
- Advantage: Significantly reduces the risk of cracking
Tip 3: Focus Accurately on the Surface
Glass is unforgiving to focus errors. An inaccurate focus causes laser energy to scatter, resulting in blurry marks. Ensuring the laser is precisely focused on the glass surface—not inside or above it—is the foundation of clear engraving results.
- Key Points: Use a focus tool for precise focusing
- Advantage: Ensures laser energy density reaches the threshold for clear marks
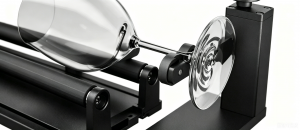
Tip 4: Use a Rotary Axis for Curved Surfaces
When engraving cylindrical or curved glass such as cups, bottles, or tumblers, a Rotary Axis attachment is essential. Without it, the curved surface causes the focus to shift, resulting in distorted and blurry text and patterns.
- Key Points: Use a rotary attachment and refocus before engraving
- Advantage: Ensures consistent results across curved surfaces
Tip 5: Always Test on Scrap First
Whenever switching to a new type or thickness of glass, always test on scrap material first. Different glass compositions (soda-lime, borosilicate, crystal, etc.) react very differently to lasers. Even the same type of glass can produce different results depending on color and thickness.
- Key Points: Record successful parameter combinations and build your own parameter library
- Advantage: Prevents wasting expensive glass workpieces
If you want to use a rotary axis for laser engraving glass cups, check here.
How to Use Laser Engraving Paper for Glass
Step 1: Prepare the Glass Surface
Clean the glass thoroughly with isopropyl alcohol (IPA) or glass cleaner to remove any oils, dust, or fingerprints. Even small residues can cause uneven adhesion or marking.
Step 2: Apply the Paper
Water-based paper: Soak it in water for 1-2 minutes until pliable. Place it on the glass, smooth out bubbles or wrinkles, and allow it to dry completely.
Self-adhesive paper: Simply apply it like a sticker, ensuring full contact with the glass surface.
Step 3: Set Laser Parameters
| Parameter | Recommended Starting Point |
|---|---|
| Power | 15% – 25% (for 40W-60W CO₂ laser) |
| Speed | 250 – 350 mm/s |
| DPI | 254 – 300 DPI |
| Passes | 1 pass (try multiple light passes instead of increasing power) |
Note: Always test on a scrap piece first to find the optimal settings for your specific machine and glass type.
Step 4: Engrave
Run the engraving job. You may notice smoke or odor from the paper burning—this is normal. Ensure proper ventilation or use a fume extraction system.
Step 5: Clean Up
After engraving, rinse the glass with warm water and gently rub off the residual paper. The mark should remain clear and permanent. For stubborn residue, use a soft sponge or cloth.
Alternatives to Laser Engraving Paper
| Alternative | How It Works | Pros | Cons |
|---|---|---|---|
| Wet Newspaper / Paper Towel | Moisture distributes heat evenly | Free, readily available | Less consistent; may leave water marks |
| Masking Tape | Low-tack tape acts as a heat barrier | Cheap, easy to apply | Results vary; not as sharp |
| Acrylic Paint | Thin coat of white or colored paint | Low cost; easy to clean up | Requires even application; drying time |
| Laser Marking Compound | CerMark or similar products | Professional results; high contrast | More expensive than paper |
| Flat White Spray Paint | TiO₂-based paint (e.g., Krylon, Rust-Oleum) | Good contrast; affordable | Requires ventilation; cleanup with alcohol |
| Dish Soap Method | Thin layer of liquid dish soap | Very cheap; household item | Not suitable for fine details; results vary |
Related Videos
Are you considering entering the world of 3D crystal engraving or glass laser engraving, but unsure which machine is right for you? In this video, we'll show you how to choose the perfect glass engraving machine in three simple steps. We also cover innovative laser engraving applications in glass processing, helping you stay ahead of the latest trends and unlock the full potential of this industry.
FAQ
A: CO₂ lasers (10.6μm) work best with engraving paper, as the paper is specifically designed to absorb this wavelength. Diode lasers can also work but may require more parameter tuning. Fiber lasers are generally not suitable for glass engraving, even with paper.
A: Yes. Laser engraving paper also works on ceramics, stone, marble, and some plastics. It is less effective on metals—use specialized metal marking compounds instead.
A:
Common causes include:
- Coating too thick: The laser energy is absorbed by the coating rather than reaching the glass
- Focus off: The beam is not precisely on the glass surface
- Power too low or speed too high: Not enough energy to sinter the coating
- Uneven paper application: Bubbles or wrinkles create inconsistent results
Solution: Reduce coating thickness, recalibrate focus, run a power/speed test matrix, and ensure smooth paper application.
A: Rinse with warm water and gently rub off the residual paper with a soft sponge or cloth. For stubborn residue, use a small amount of isopropyl alcohol. Avoid abrasive scrubbers that could scratch the glass.
A: Yes, masking tape can be used as a low-cost substitute, but results are less consistent. The tape acts as a heat barrier and can produce a frosted effect, but it does not provide the same contrast or sharpness as dedicated engraving paper.
You may be interested in
Do you have any other questions about laser engraving paper for glass?
Post time: Jul-17-2026