
Laser Engraving Powder Coat: The Art of Fade-Proof Marks on Cups
What Is Powder Coating Laser Engraving?
Powder coating laser engraving uses laser energy to vaporize the coating layer and expose the bare metal underneath—it removes the coating, not the metal itself. Engraving quality depends on clean removal, not depth, to create crisp contrast. The biggest advantage is permanence: unlike printing or decals, the mark won't fade, peel, or wear off.
Why Choose Laser Engraving for Powder-Coated Cups?
If you're considering custom marking for cups, laser engraving offers clear advantages over traditional methods.
| Comparison | Laser Engraving | Screen Printing / Decals |
|---|---|---|
| Durability | Permanent, won't wear off | May peel or fade with long-term use |
| Precision | Can engrave complex logos, small text, photos | Limited by screen mesh resolution |
| Customization | Design-to-file, change anytime—no tooling | Each design requires its own screen or plate |
| Per-Unit Cost | Excellent for one-offs or small batches | High setup costs, favors large batches |
Additionally, powder coating itself is known for its durability and color richness. When combined with laser engraving, the result is an aesthetically pleasing and long-lasting product. Whether for corporate gifts, event souvenirs, or personal customization, this process delivers high-quality results.
Preparation Work for Laser Engraving Powder-Coated Cups
-253x300.png)
Laser Engraver
CO₂ laser is the top choice—it effectively removes powder coating with the best results.
Rotary Attachment
Essential for securing cylindrical cups—ensures smooth, wobble‑free rotation during engraving.
File Preparation
| File Type | Best For | Characteristics |
|---|---|---|
| Vector Files (.ai, .eps, .svg) | Text, logos, geometric shapes, borders—anything requiring sharp edges | Defined by mathematical paths—scales without loss of quality, produces razor‑sharp edges. Preferred format for cup engraving. |
| Raster Files (.jpg, .png, .bmp) | Photos, gradients, complex images with shading or rich detail | Pixel‑based—ideal for smooth tonal transitions and fine detail rendering. |
Important: Focus settings differ between vector and raster files—do not assume they are the same.
Vector engraving: Focus is typically set on the coating surface to achieve the sharpest edges.
Raster engraving: Focus may need fine‑tuning based on image depth and detail requirements. Some designs benefit from a slightly lower focus to capture finer pixel details, but excessive lowering can blur edges. Always run a sample test before production to confirm the optimal focus position.
Auxiliary Tools
Coating Thickness Gauge (optional): Measures coating thickness at different points to anticipate parameter adjustments.
Protective Gear: Dust mask + fume extraction—engraving powder coating generates smoke and fine particles.
The Process of Laser Engraving Powder‑Coated Cups
Step 1: Clean the Cup
Wipe the cup surface with isopropyl alcohol or a mild degreaser to remove dust, oil, and fingerprints.
Step 2: Mount the Rotary Attachment
Secure the rotary attachment to the laser bed, place the cup into the fixture, and adjust both ends so the cup is perfectly level. Spin by hand to confirm smooth rotation with no wobble. For cups with significantly different top and bottom diameters, use a fixture with adjustable support heights.
Step 3: Import and Position Your Design
Import your design file and resize appropriately. Place the design on the upper half of the cup—the curvature is gentler there, making focus more stable.
Step 4: Set Laser Parameters
Golden rule: balancing speed and power is more important than just cranking up the power.
Starting reference (80W CO₂ laser): 50% speed, 80% power, 400–600 DPI
Adjustment logic: If engraving looks blackened or has a "halo" → increase speed first, not lower power
Always test first: Different manufacturers and colors react differently—run a small parameter test grid for each new batch.
Quick Troubleshooting:
| Problem | Cause | Fix |
|---|---|---|
| Stubborn residue | Insufficient energy density | Increase power or decrease speed; allow cooling between passes |
| Splotchy, uneven results | Uneven coating thickness | Use a thickness gauge to anticipate; slightly defocus; accept minor variation |
| Light engraving barely visible | Low contrast with metal color | Switch to dark-colored cups |
Step 5: Run the Engraving
After focusing, start the engraving and watch for unusual smoke or sparks. Fume extraction is mandatory.
Step 6: Clean the Finished Product
Wipe the engraved area with a degreaser to remove residue. For stubborn residue (common with blue and red coatings), use a Magic Eraser gently.
Laser Engraving Rotary Axis Video
This video will guide you step by step through installing the rotary attachment on the laser engraver, turning on the machine, importing files, adjusting parameters, and performing engraving, while also showcasing the detailed results of engraving on glass cups.
If you want to learn more about laser rotary attachment engraving on cups and bottles, click here.
Practical Tips and Techniques for Laser Engraving Powder Coating
Pain Point 1: Stubborn Residue
Even after 5+ passes, some coating won't fully vaporize—leaving melted residue on the metal.
Strategies:
- Allow cooling between passes—continuous passes cause melting, not vaporization
- Increase power or decrease speed for higher energy density
- Clean with isopropyl alcohol, LA Awesome, or degreaser + Magic Eraser
Pain Point 2: Cleaner Corrosion
Strong alkalis (like sodium hydroxide/lye) can turn certain aluminum alloys black and corrode them beyond repair.
Strategies:
- Test any strong cleaner on a hidden spot first
- Start with mild options: alcohol, mild dish soap, or professional degreasers
- Different batches may use different alloys—don't assume consistency
Pain Point 3: Uneven Coating Thickness
Coating thickness varies across the same cup. Same laser settings = perfect in thin areas, incomplete in thick areas.
Strategies:
- Measure thickness beforehand with a gauge to anticipate variations
- Slightly defocus the laser to maintain effective energy over a larger range
- Accept "reasonable" unevenness: If variations are within an acceptable range, slight unevenness can create a unique "handcrafted" aesthetic—don't chase absolute perfection
Machine Recommendations for Laser Engraving Powder-Coated Cups
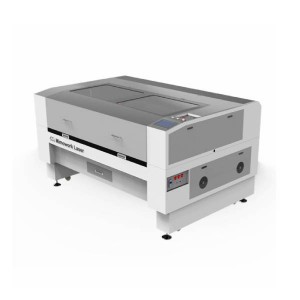
| Evaluation Dimension | Key Advantages | Value for Powder Coating |
|---|---|---|
| Engraving Quality | CO₂ laser (40–100W), wavelength matches powder coating for efficient ablation | High-contrast, sharp, permanent marks—logos and gradients reproduced accurately |
| Engraving Speed | Stepper motor, 1–400mm/s, sufficient for daily needs | Boosts productivity for bulk orders without sacrificing precision |
| Expandability | Optional rotary attachment for cylindrical items | Uniform, distortion-free engraving on curved cup surfaces |
| Evaluation Dimension | Key Advantages | Application Value |
|---|---|---|
| Processing Quality | CO₂ laser (100W–300W) with a knife strip table provides stable energy, reducing scorching and spatter on powder-coated surfaces for clean results. | Clean, slag-free edges, no discoloration—ideal for intricate plastic parts |
| Processing Speed | Stepper motor, 1–400mm/s | Meets daily production, stable and reliable |
| Expandability | Optional rotary attachment (cylindrical items); larger worktable options | worktable size and laser power are customizable to accommodate various cup sizes and future upgrades. |
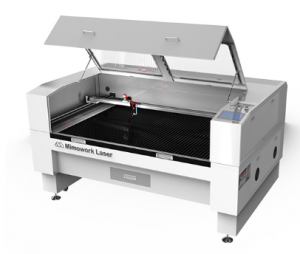
If you would like to know whether your powder-coated workpiece dimensions are suitable for engraving, please feel free to contact us.
FAQ
A:The laser precisely ablates and removes the surface powder coating through heat, exposing the underlying metal substrate to create a high-contrast mark. It does not engrave the metal itself.
A:Yes, but results vary significantly depending on coating color and laser wavelength. Diode lasers (fiber lasers, ~1064nm) can ablate powder coating, but they're more sensitive to coating color than CO₂ lasers. Dark colors work well; light or bright colors often produce poor results.
A:This is possible but challenging. The key issue is powder adhesion—laser-fused powder tends to peel off smooth surfaces. One approach: use the laser to create a rough recess, fill it with colored powder, then re-melt it with the laser so it anchors into the textured pocket. This requires extremely precise laser homing accuracy.
A: This is a common pain point. One workaround is to temporarily block the fan's air intake (while monitoring temperature). Alternatively, fill the powder manually after removing the workpiece, and cure it with a heat gun.
Do you have any questions about laser cutting thermal conductive graphite sheets?
Post time: Jun-22-2026